Voice-Controlled Raspberry Pi
Okay Google, pause Kodi.
Any sufficiently advanced technology is indistinguishable from magic.
― Arthur C. Clarke, Profiles of the Future: An Inquiry into the Limits of the Possible
Ever since Raspberry Pi came into my world, I have been exploring better ways to interact with it. Take Kodi the media player for example - yes, keyboard and mouse are fine; yes, the native web interface is super powerful; and yes, you can even use your TV remote directly if it’s HDMI-CEC-compatible. But there’s something about Raspberry Pi’s small form factor (and perhaps its open source spirit) that just makes me wish for a hands-free experience.
Ideally, I would like my Google Home Mini/Google Assistant to pick up my voice command, send it over to the Raspberry Pi and make it to do something useful. To my great surprise, there doesn’t seem to be a satisfactory end-to-end solution anywhere that suits my need. However, that’s about to change - please join me in my quest to build a voice-controlled Raspberry Pi. Before we dive into the technical mumbo jumbo, here is a quick rundown of all the hardware/software we need:
- Raspberry Pi and Kodi
- Webhook
- Port forwarding
- FreeDNS
- IFTTT
- Google Assistant (or any voice assistant that IFTTT supports for that matter)
Okay Google, pause Kodi and let’s get started.
Media Playback Controls - A Typical Use Case
For those who are unfamiliar with the name, Kodi is an all-in-one solution for media consumption. For starter, it integrates almost every video streaming service on earth into a unified interface, be it YouTube, Netflix or even Google Drive. In addition to its core functionalities as a media player, Kodi supports extensions that can do much more through the installation of add-ons. Did I mention that it has a lovely weather widget?
Kodi also shines in the input department. On top of the keyboard/mouse, web interface or TV remote option, the kodi-send command lets user control the player via command line. For example, if we are interested in replicating the effect of pressing the play button, we only need to need to run:
kodi-send --action="PlayerControl(play)"
To wrap it in a shell, let’s create the following script /usr/local/bin/pictrl:
#!/bin/sh
action=$1

if [ "$action" = "play" ] || [ "$action" = "pause" ]
then
  kodi-send --action="PlayerControl(play)"
fi
and it’s ready to roll. Since play and pause are basically the same command in different contexts, we also get the pause function for free.
Milestone: now you can use pictrl play in the command line interface (or over SSH) to play (or pasue) the video on your Raspberry Pi.
Webhook - Listening and Responding to a Web Request
Next up we are going to trigger that pictrl script with an http request. For that, we will use webhook, a cool piece of technology that enables responding to http requests with custom callbacks.
To enable webhook, first create the configuration file /etc/webhook.conf:
[
  {
    "id": "pictrl",
    "execute-command": "/usr/local/bin/pictrl",
    "command-working-directory": "/home/pi/",
    "pass-arguments-to-command":
    [
      {
        "source": "query",
        "name": "action"
      }
    ]
  }
]
that points a new webhook instance to the pictrl command. After that, the webhook can be started as a service using:
sudo systemctl start webhook
or auto-started upon startup by running:
sudo systemctl enable webhook
Note that for such a service that is intended to be accessible over the internet (as will become true in the next step), it’s probably a good idea to authenticate the identity of the requester in some form. For example, you can ask the requester to submit a token that only a trusted user knows along with the request itself.
Milestone: now you can use the link http://localipaddress:port/hooks/pictrl?action=play on any device within the same network to control your Kodi player.
Port Forwarding - Exposing Local Service to the Public
A local IP address, by definition, isn’t visible outside the local network. To fix the problem, it’s generally required to log on to your modem/router as admin and configure what’s known as port forwarding. From then on, instead of using http://localipaddress:port locally, we can call http://publicipaddress:port over the internet and the request will be directed to the same place.
In case you don’t have admin control over your modem (which is unfortunately true in my case), Webhook Relay can be helpful although its free tier only supports up to 150 “relays” per month. Another service called ngrok can be equally effective, with the catch being no permanent subdomain support for the free tier users. Other solutions include a dedicated VPN/VPS that allows for port forwarding. You see, they all cost money if you want the optimal experience.
Milestone: now you can use the link http://publicipaddress:port/hooks/pictrl?action=play on any device that’s connected to the internet to control your video player.
Dynamic DNS - Your Raspberry Pi’s Permanent Domain Name
For most internet users at home, chances are that their public IP addresses aren’t static. With each reboot of the modem, a new address will be assigned by the ISP which makes it annoying if you are looking for a more permanent solution. Don’t worry - dynamic DNS services such as FreeDNS can come to the rescue. These services essentially maintain a list that maps the domain (or subdomain) names to their corresponding IP addresses, and each user tells them to update the list whenever the IP address changes. To automate this, run the following command at Raspberry Pi’s startup:
curl https://freedns.afraid.org/dynamic/update.php?[yourtokenhere]
If all goes well, instead of changing http://publicipaddress each time the modem restarts, a new and permanent name http://domainname is all we have to remember.
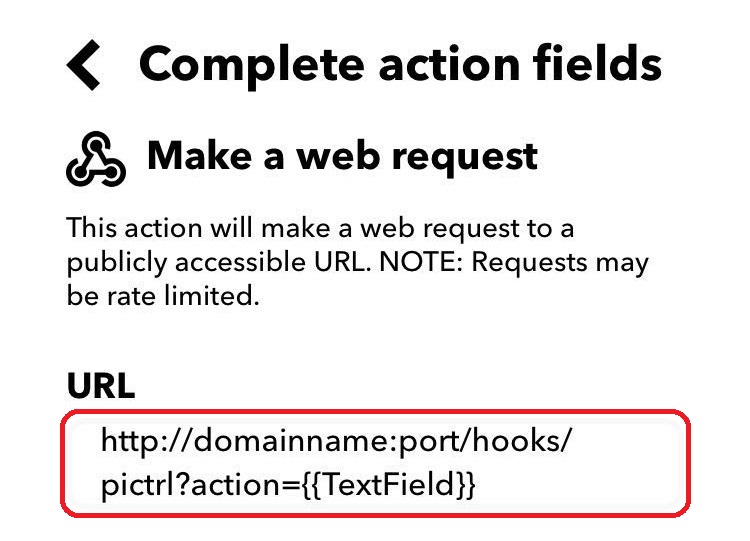
Milestone: now you can use the link http://domainname:port/hooks/pictrl?action=play on any device on the internet to control your video player.
IFTTT - Connecting to A Voice Assistant
IFTTT, short for “If This Then That”, provides a convenient way to create a hub that connects a variety of services (including voice assistants) where they can interact with each another based on a set of user-defined rules (called applets). At the time of writing, IFTTT allows each user to create up to 3 applets for its free tier. As the name implies, every applet follows the “If This Then That” structure:
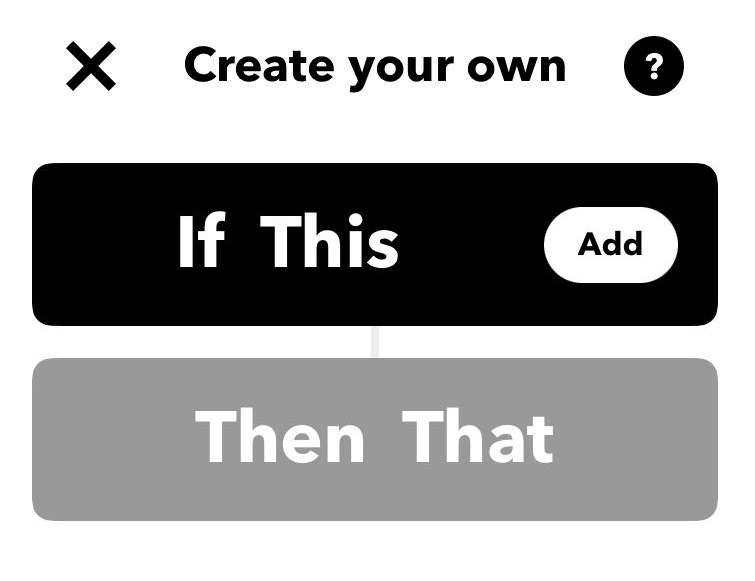
and creating a new applet boils down to defining the two pieces: the “If This” and the “Then That”.
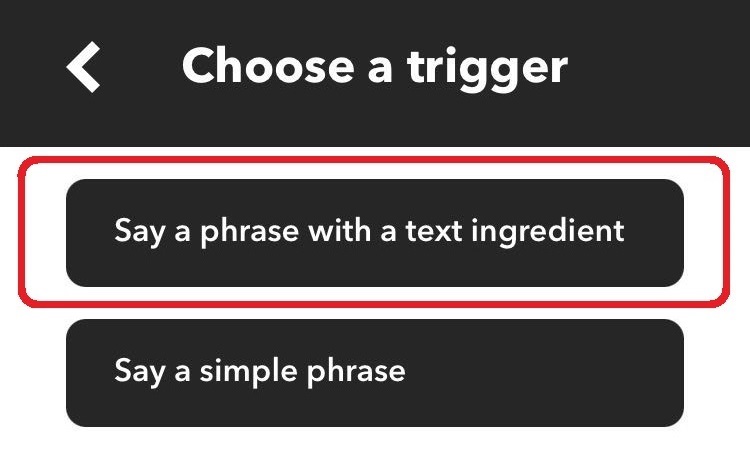
So let’s configure the “If This” first by selecting the Google Assistant option (you might be asked to link your Google account to IFTTT). In the next screen, although the “Say a simple phrase” option is more than enough to get the job done, the “Say a phrase with a text ingredient” option is preferred as it will be a lot more flexible when it comes to further customizing our voice commands.
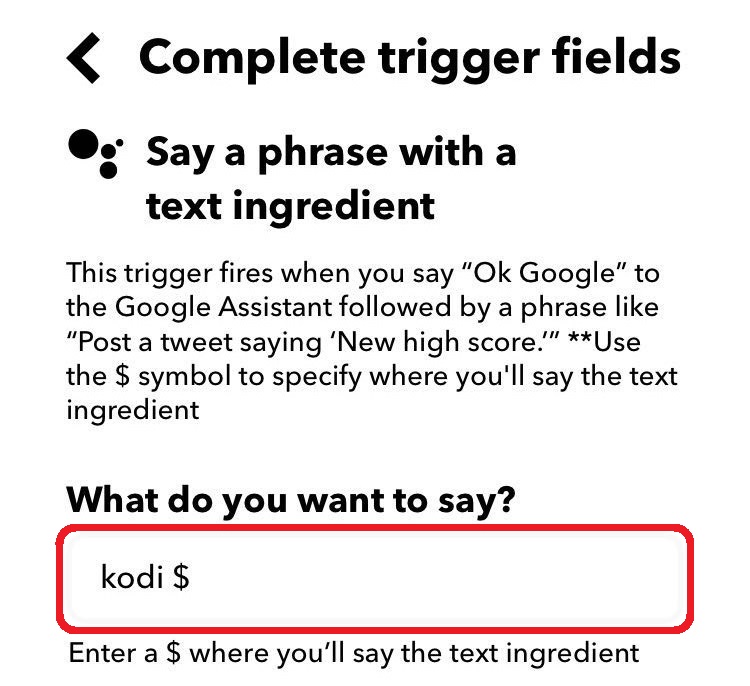
That brings us to the trigger configuration. Personally, I use “kodi” as my keyword, followed by a custom text field. The rest is not important.
Next, onto the “Then That” piece, what we want to choose is the webhook service that we created in the previous step, with the exact action being configurable for future development’s sake:
Save and continue. That’s it - our first IFTTT applet has just become fully operational.
Final milestone: now you can say the following magic words to play (or pause) the video on your Raspberry Pi’s Kodi player:
Okay Google, Kodi play!
Putting It All Together
As you might have noticed by now, your voice can be literally as powerful as your computer is. The toolchain we’ve explored so far makes it possible to invoke almost any action of our choice with almost any words of our choice. What’s more, any additional development will only need to happen locally inside the pictrl dispatcher, so it’s easily scalable if we want our Raspberry Pi to learn a new trick. Last but not least, what to do with such limitless possibility might be a matter of user experience at the end of the day, so please let me know what your mileage turns out to be.
Appendix
Install all the software packages mentioned above
sudo apt install kodi
sudo apt install kodi-eventclients-kodi-send
sudo apt install webhook
Update Oct 22, 2020: Included discussion on other solutions when port forwarding is not an option. Thanks to Mike Foden (@mikefoden) for bringing up ngrok.